The Appointment Rescheduling feature lets your customers change the date or time of their appointment directly from the an appointment link they receive in their confirmation email without needing to call or message you. This will no longer come through as part of a cancellation notification and is it's own stand alone feature.
You stay in full control: you decide whether rescheduling is allowed, how far in advance customers must reschedule by, and how many times they can reschedule.
If you handle your online booking system or certain appointment types by having appointment requests, reschedule requests come through to your diary in just the same manor and require approval for the appointment to move.
If you have your online booking system set for appointments to be automatically added to the diary, the same setting will be mirrored for the rescheduling and the process of customers rescheduling will be fully automated without you needing to do anything.
This guide walks you through how to set everything up, what your customers will see, and how rescheduled appointments appear in your diary.
1. How to Enable Rescheduling
For new mybridal accounts, rescheduling is enabled by default so you may already have it switched on.
For existing accounts, the setting was automatically set to match your current cancellation setting, so if you already allow customers to cancel from their appointment confirmation page, rescheduling will have been turned on for you too.
To check or change your rescheduling settings:
- Go to your diary > click the 3 dots top right
- Click on Diary Settings
- Scroll down to the Customer Appointment Link section.
- You will see the "App can be rescheduled?" toggle. Switch it on or off depending on your preference.
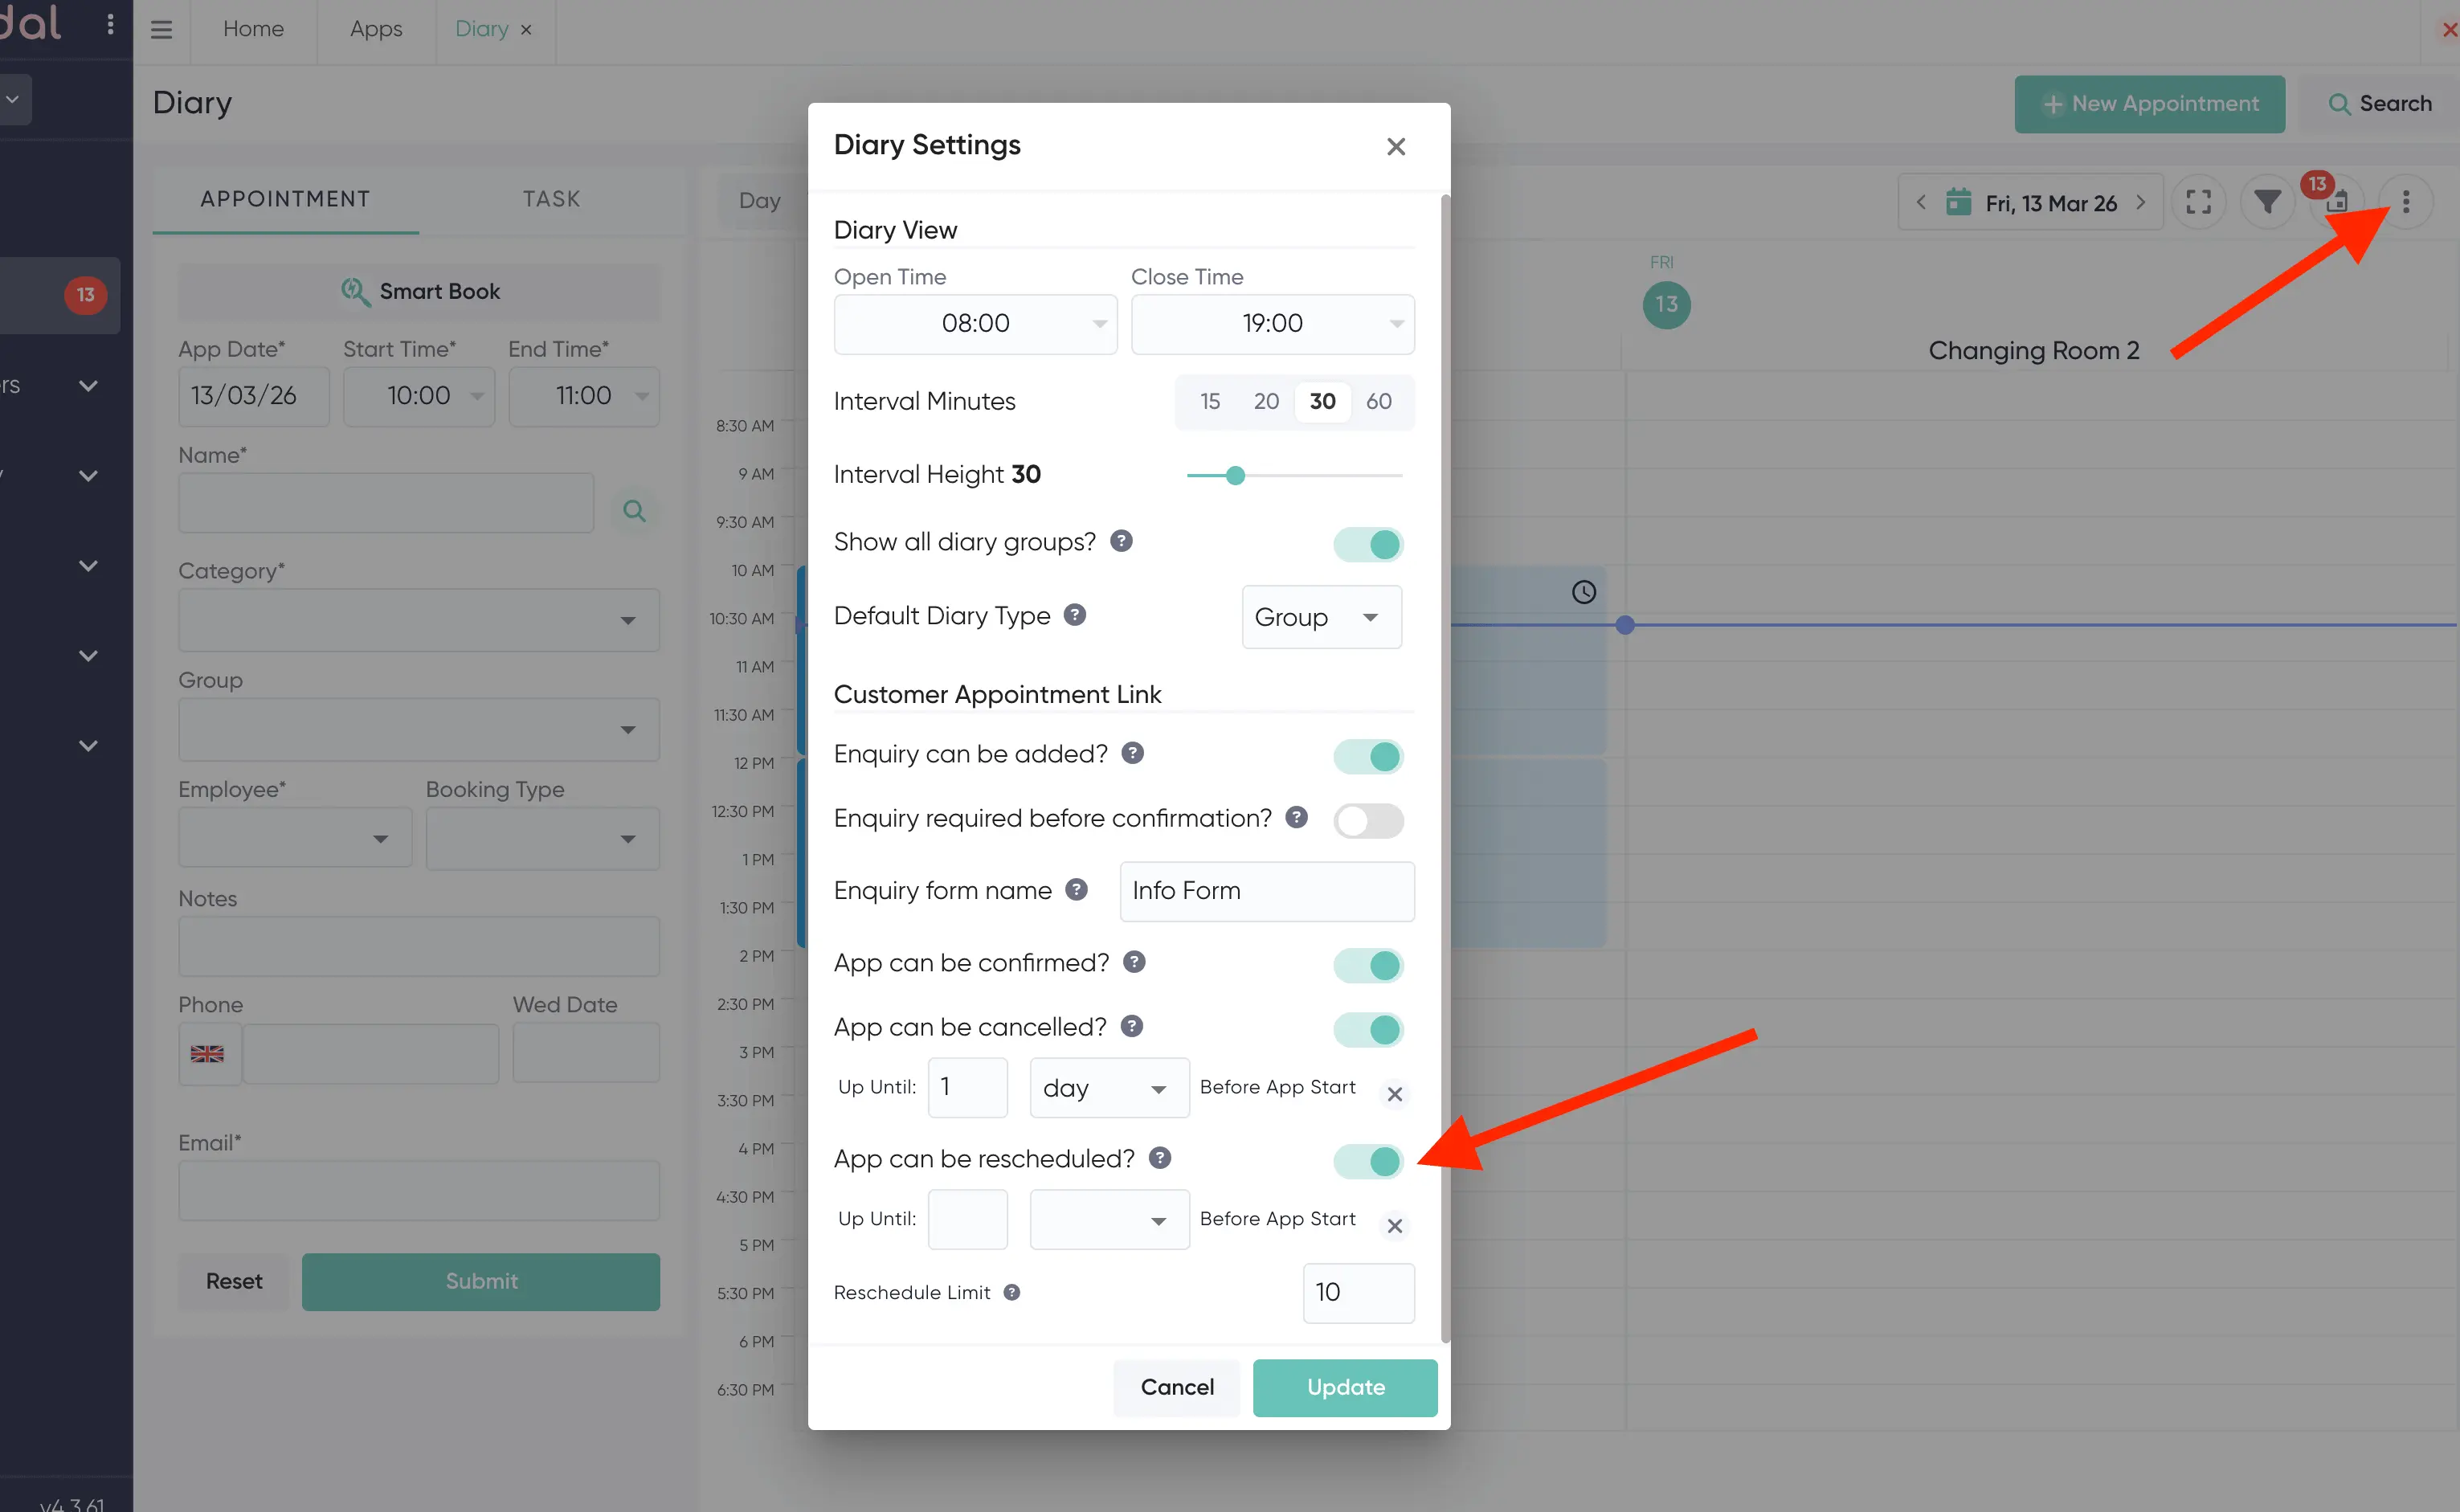
When rescheduling is turned on, two extra settings will appear:
Reschedule Deadline
This controls how close to the appointment start time a customer is still allowed to reschedule. For example, if you set it to "Up Until 24 hours Before App Start", the customer will not be able to reschedule once they are within 24 hours of their appointment.
To set a deadline, enter a number and choose a time period from the dropdown (hour, day, week, month, or year). If you do not want a deadline and are happy for customers to reschedule right up until the appointment time, you can clear this field by clicking the X button.
Reschedule Limit
This sets the maximum number of times a customer can reschedule a single appointment. For example, setting it to 2 means the customer can reschedule up to 2 times online but no more after that. If you leave it set to 0, there is no limit — the customer can reschedule as many times as they like.
2. What Your Customer Sees
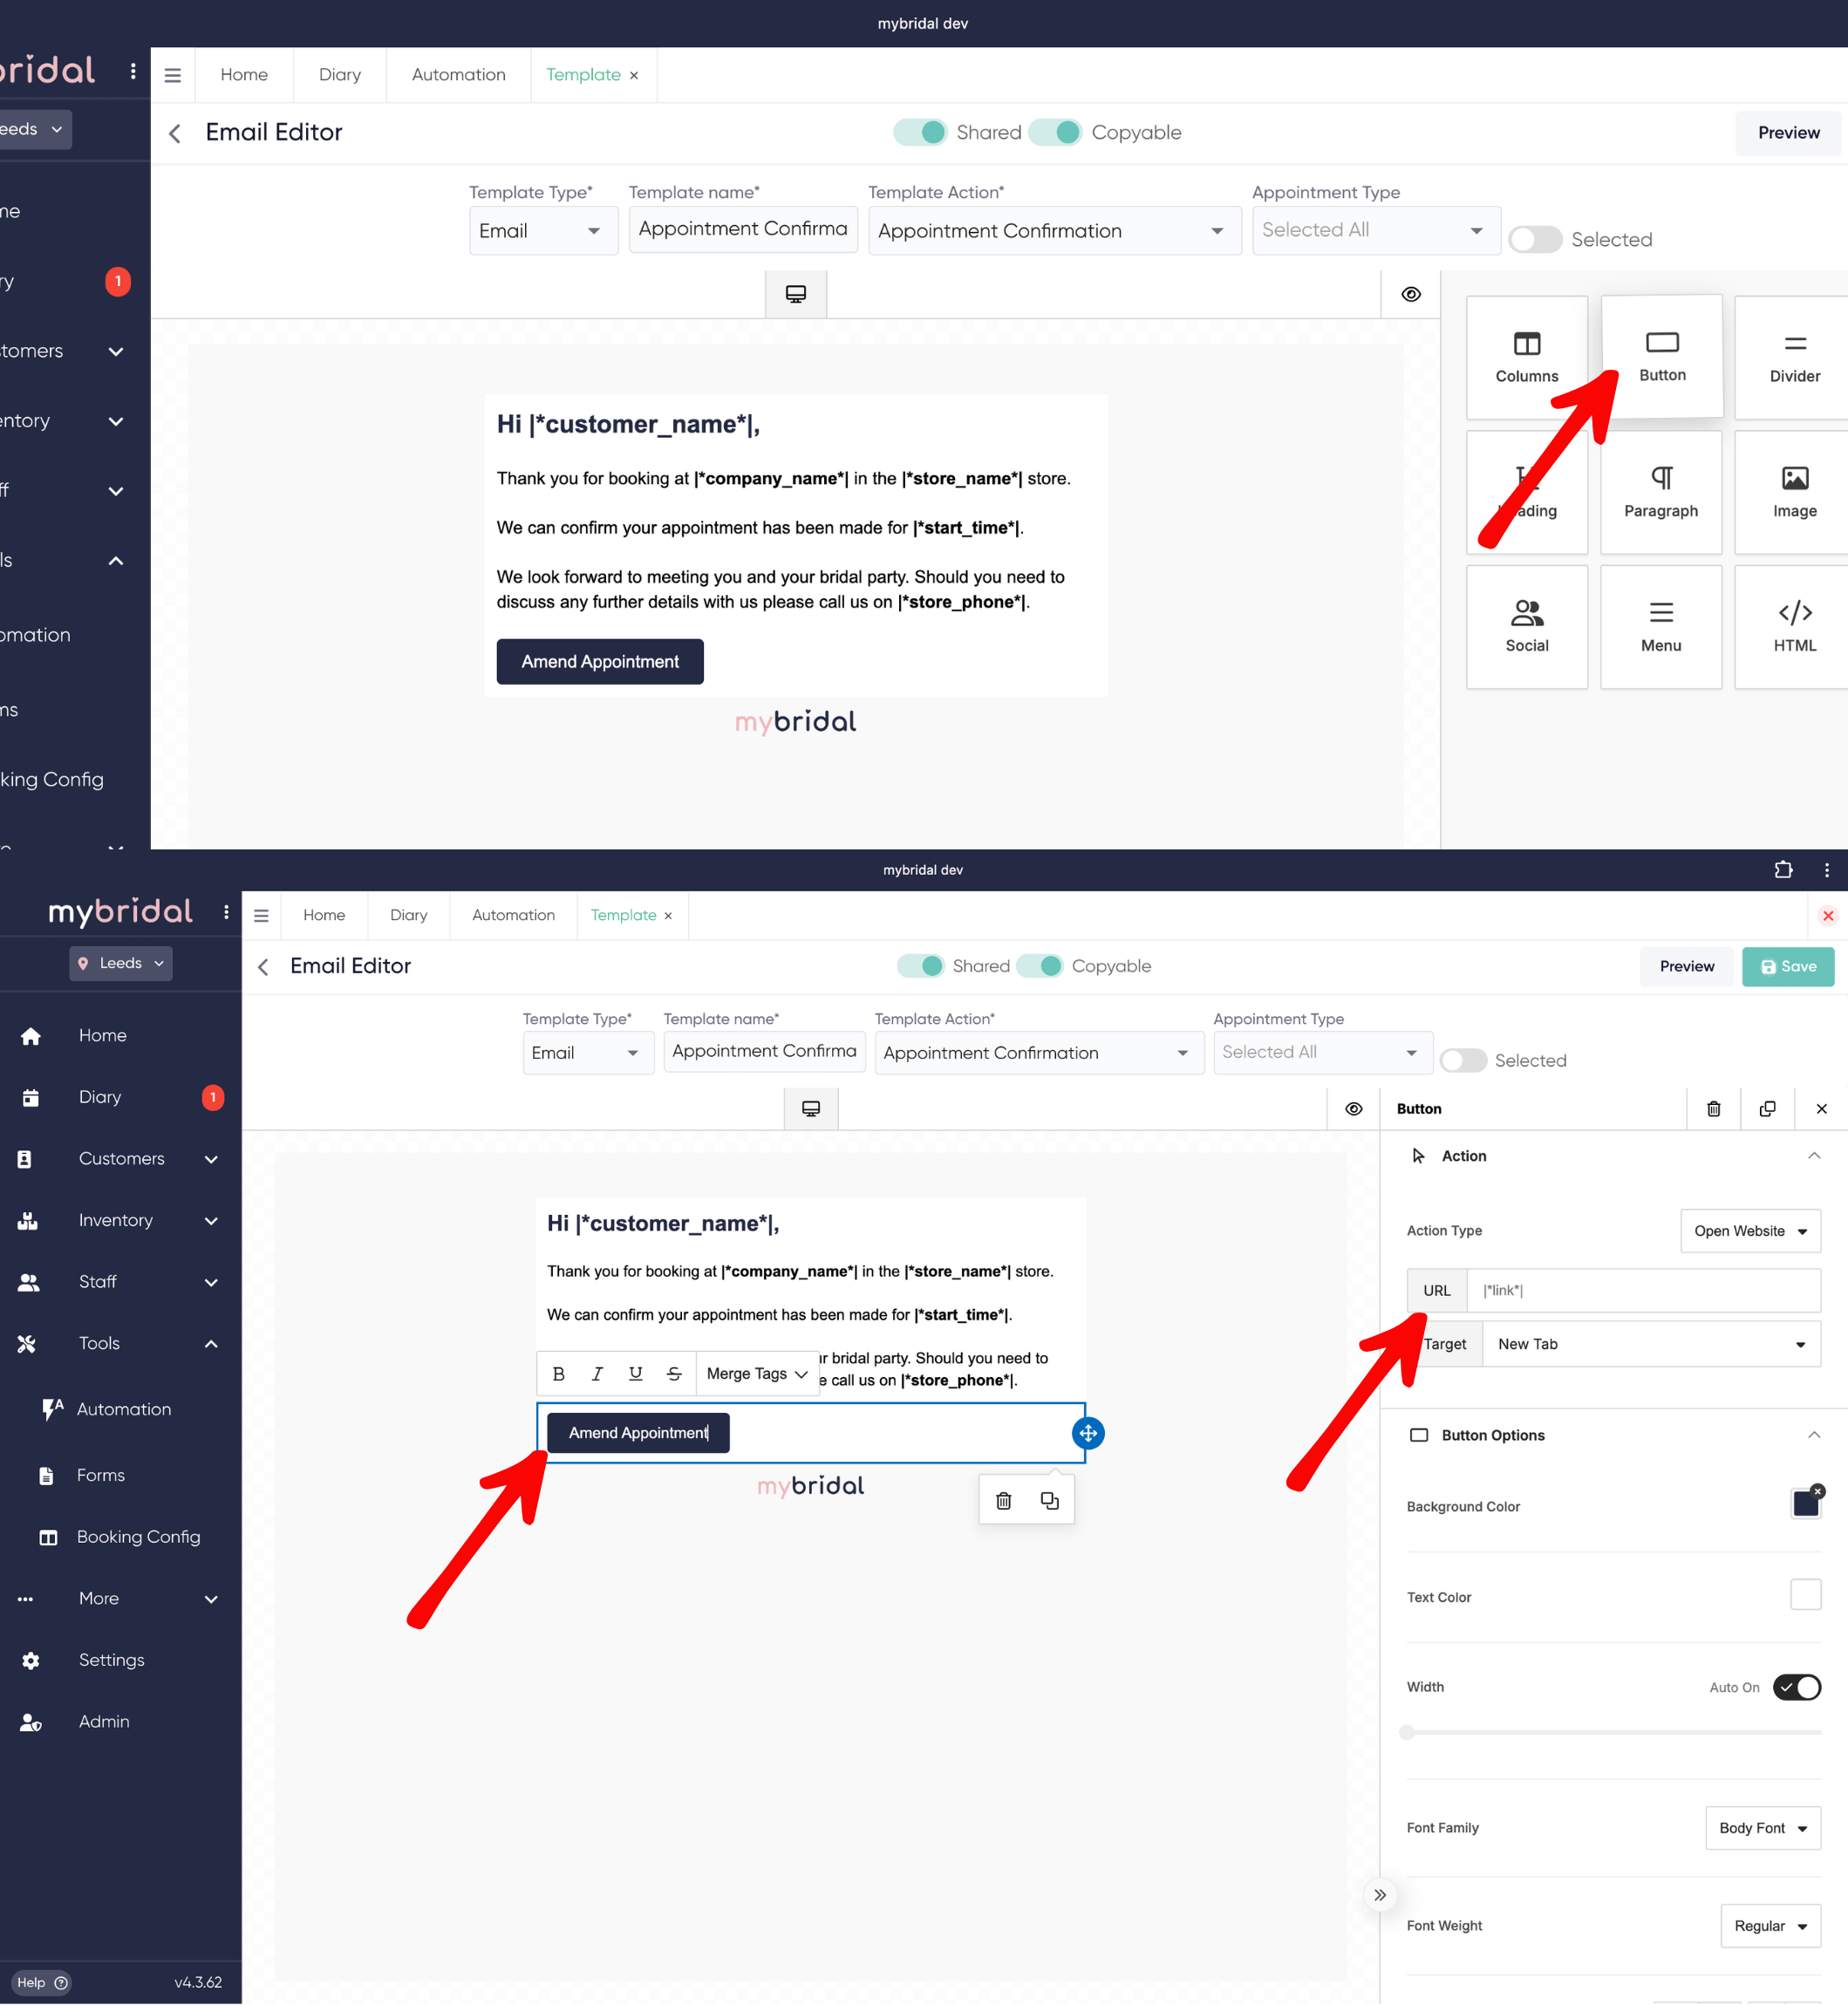
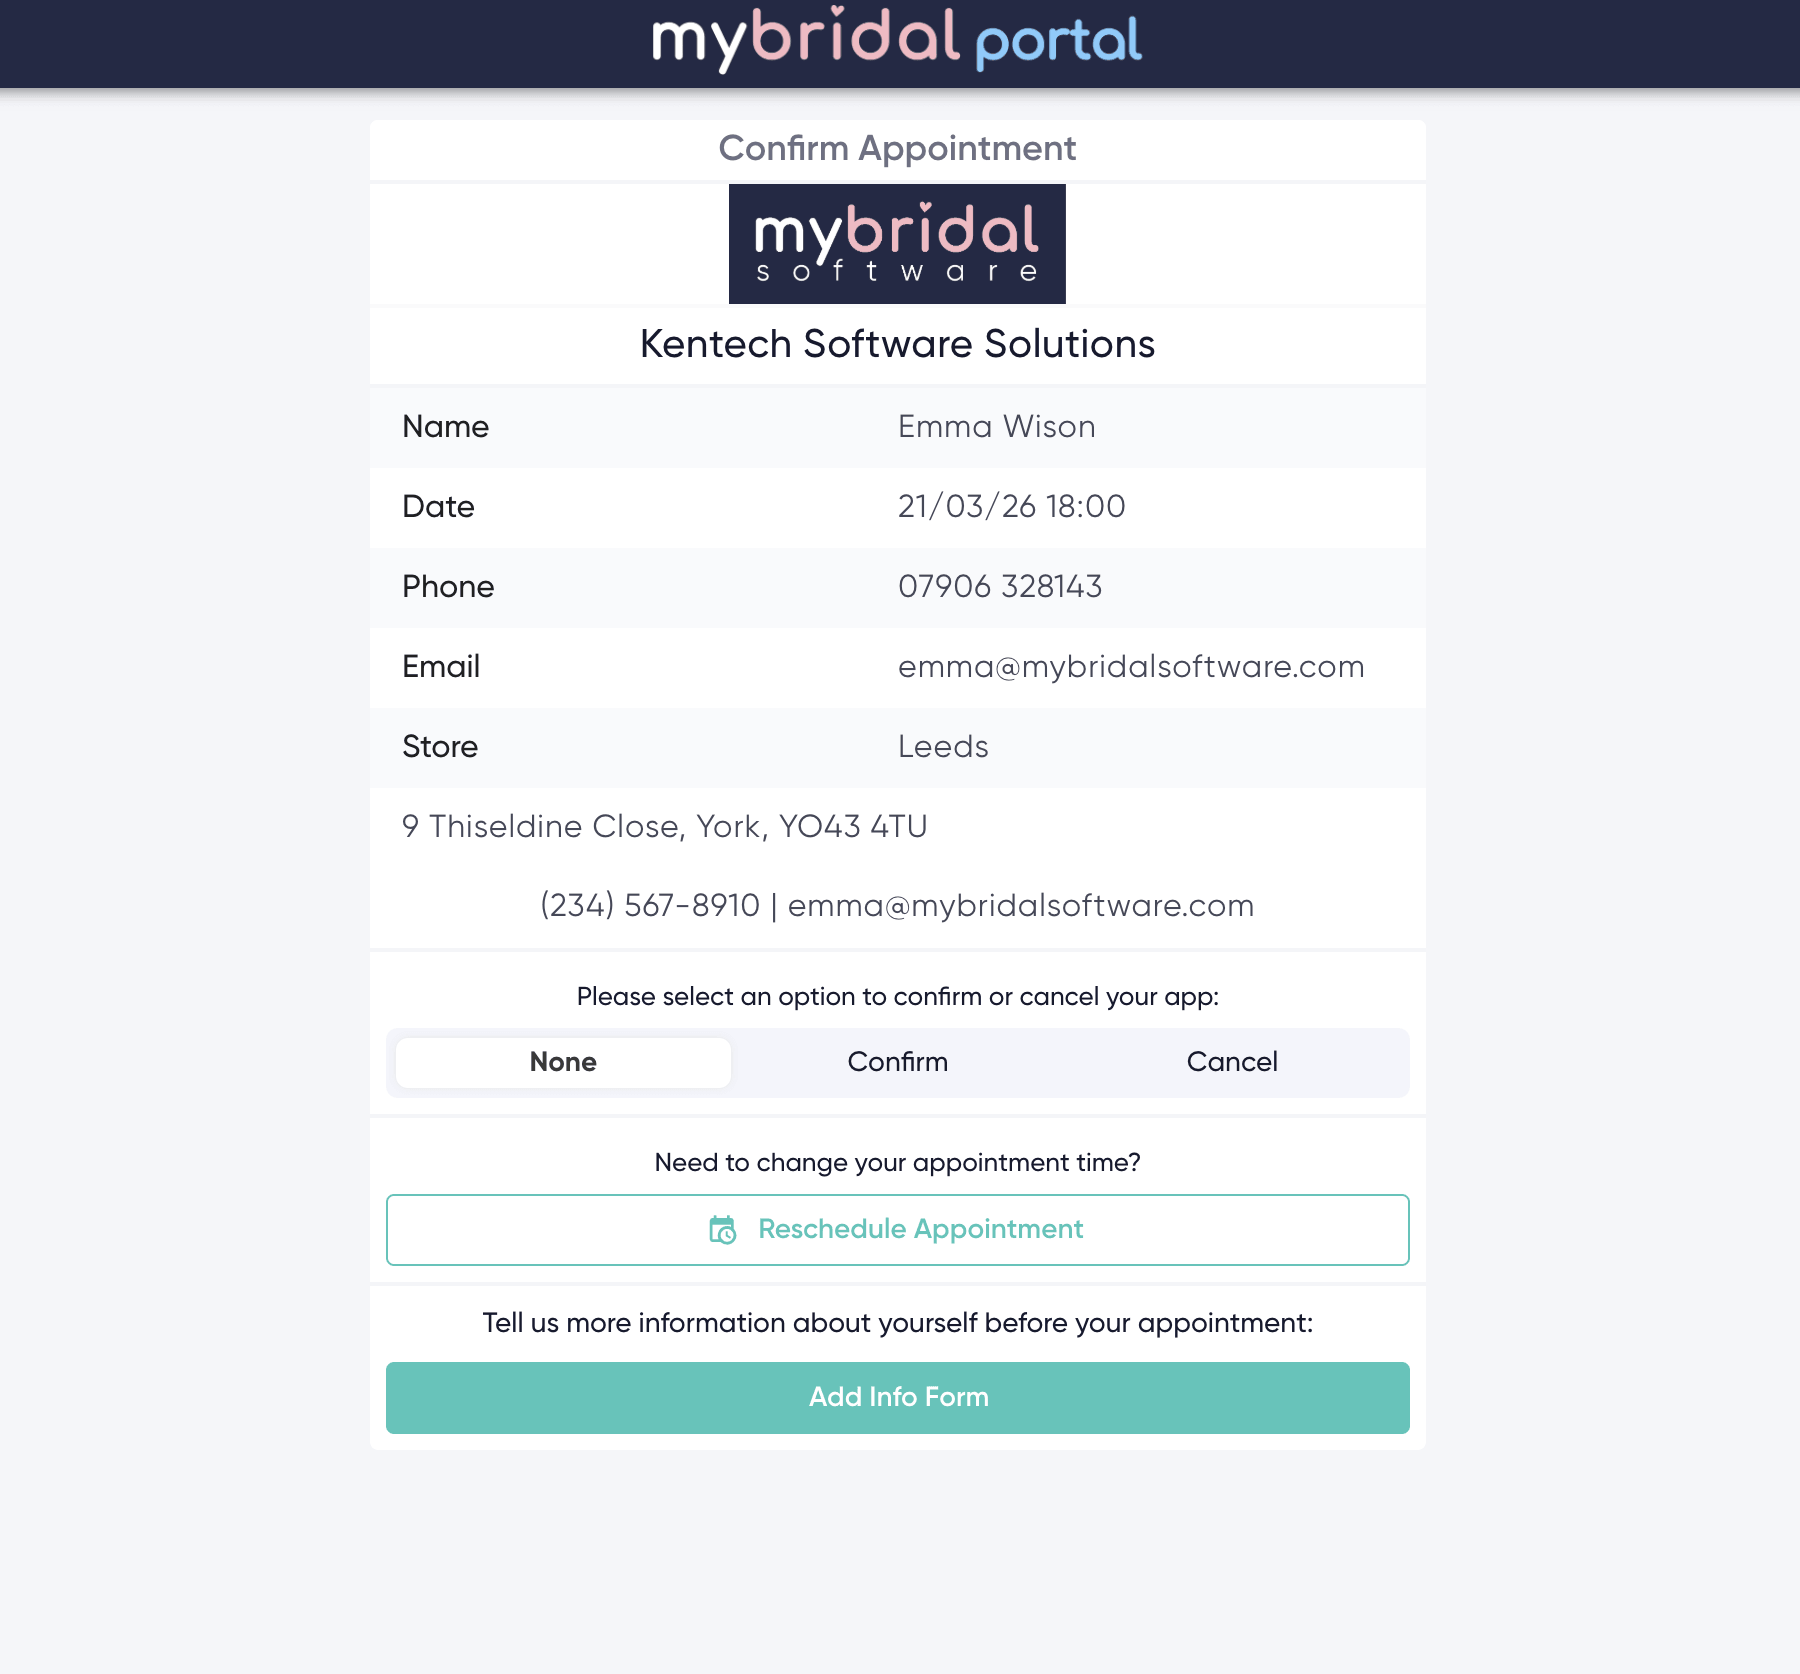
Our default appointment confirmation email now contains a button saying 'amend / cancel'. When your customer clicks this they are taken to the below page which is the same page they are normally directed to to confirm their appointments on the appointment reminder message.
If you have your own customised appointment confirmation message you can add a button with the URL: |*link*| to direct your customers to the appointment confirmation page which will allow them to cancel or reschedule their appointments as soon as they are booked.
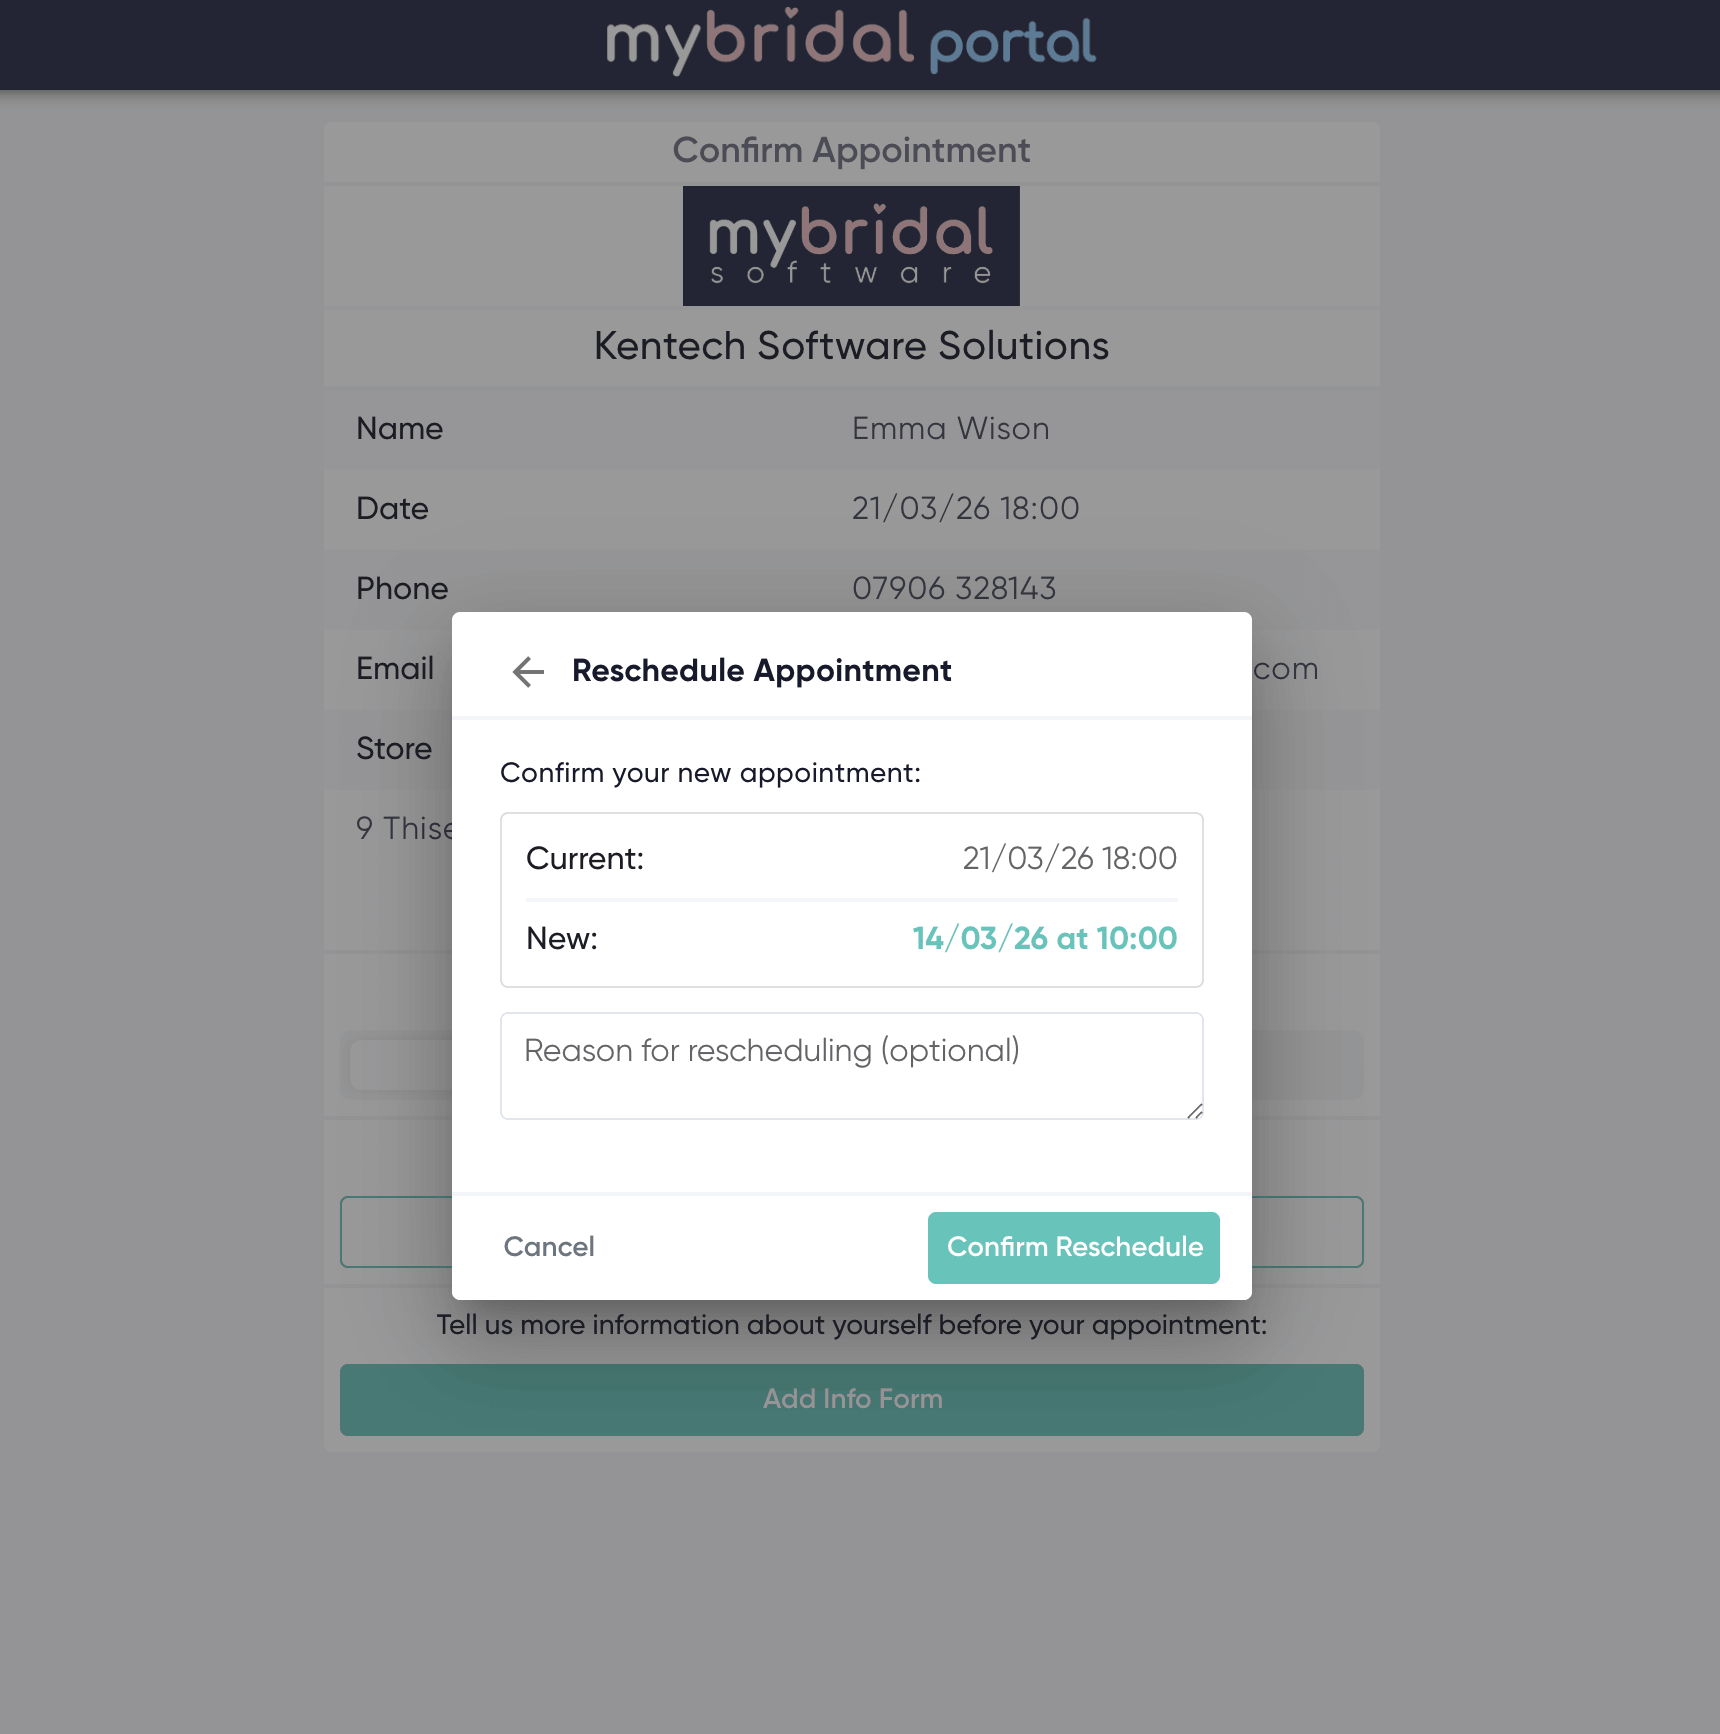
The customer will see the heading "Need to change your appointment time?" along with a "Reschedule Appointment" button.
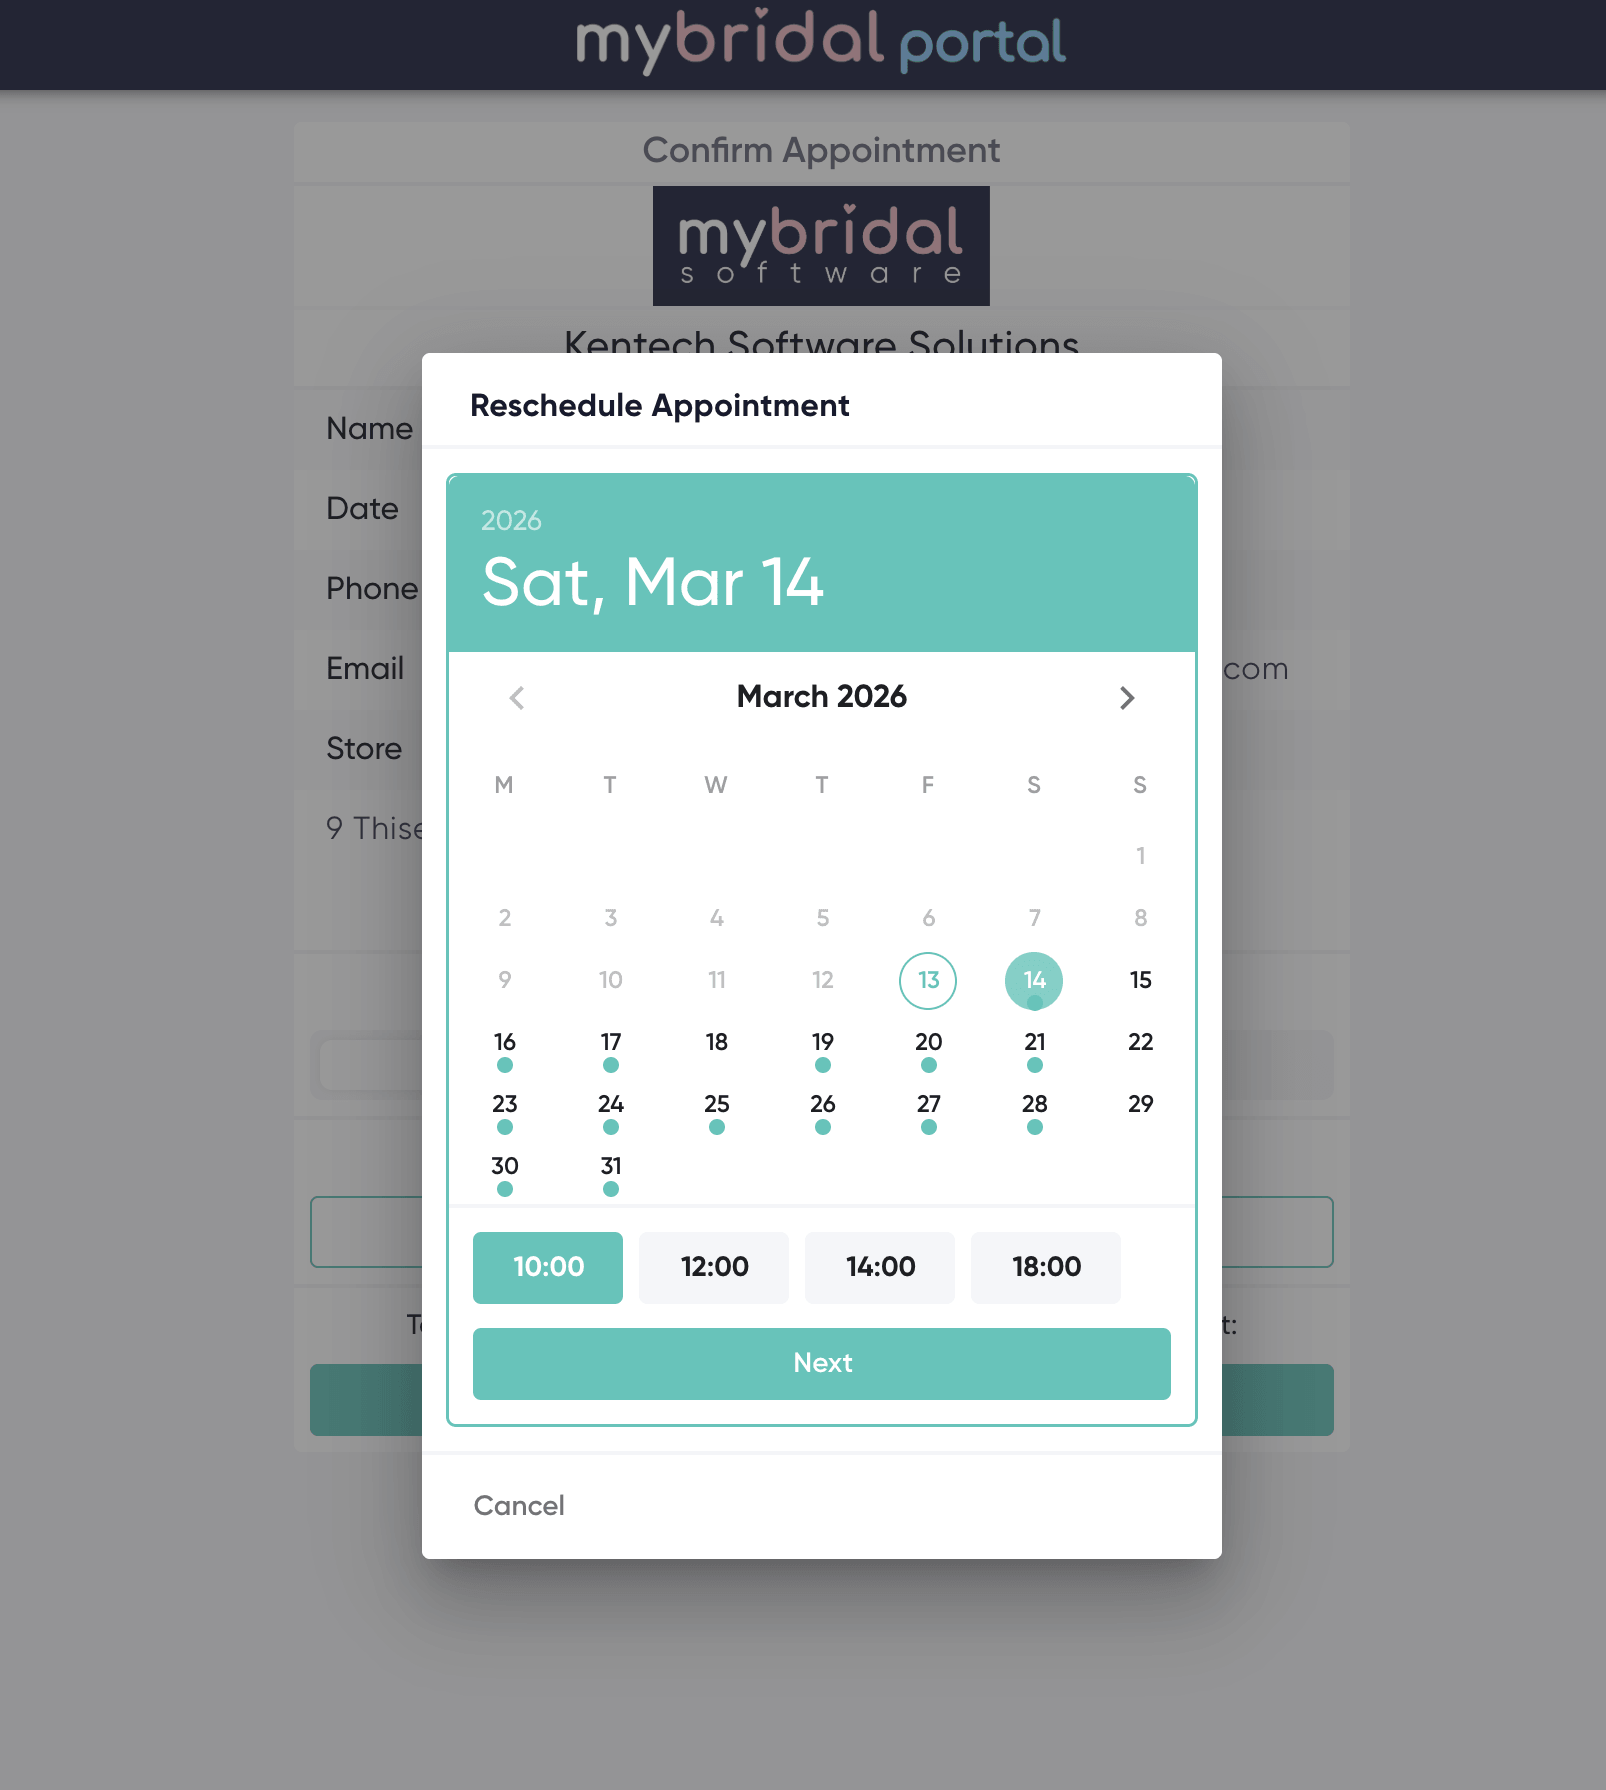
Step 1: Choosing a New Date and Time
After clicking the button, a calendar will appear. This is the same calendar used to generate your online availability on the online booking system so will show the same appointments as available. The customer can browse through the calendar to find a date that works for them. Dates that have availability will be marked with a small dot underneath them.
Once they select a date, the available time slots for that day will appear as buttons below the calendar. The customer simply taps on the time they would like to move their appointment too.
Step 2: Confirming the Change
Once the customer has picked a new time, they will see a confirmation screen showing their current appointment time alongside the new time they have chosen, so they can easily compare the two.
There is also an optional text box where they can type a reason for rescheduling (for example, "Mum can't make Saturday, moving to Sunday instead"). This reason will be visible to you in your diary.
When they are happy, they click "Confirm Reschedule".
What Happens After They Click Confirm
- Add-to-diary appointments (those that go straight into the diary with no approval): The appointment updates immediately and the customer sees the message "Your appointment has been rescheduled successfully."
- Request-based appointments (those that need your approval): The customer sees the message "Your reschedule request has been submitted. The store will confirm shortly."
When a Customer Cannot Reschedule
If the customer is unable to reschedule, the "Reschedule Appointment" button will not appear. Instead, they will see a message explaining why, along with your store's contact details so they can get in touch directly:
- Reschedule limit reached: "The maximum number of reschedules for this appointment has been reached. Please contact the store directly to rearrange."
- Deadline has passed: "The deadline for rescheduling this appointment has passed. Please contact the store directly to rearrange."
- Appointment already happened: "This appointment has already passed and can no longer be rescheduled."
3. How Rescheduled Appointments Appear in Your Diary
What you see in your diary depends on whether you have appointment requests turned on or if the appointments go straight into the diary.
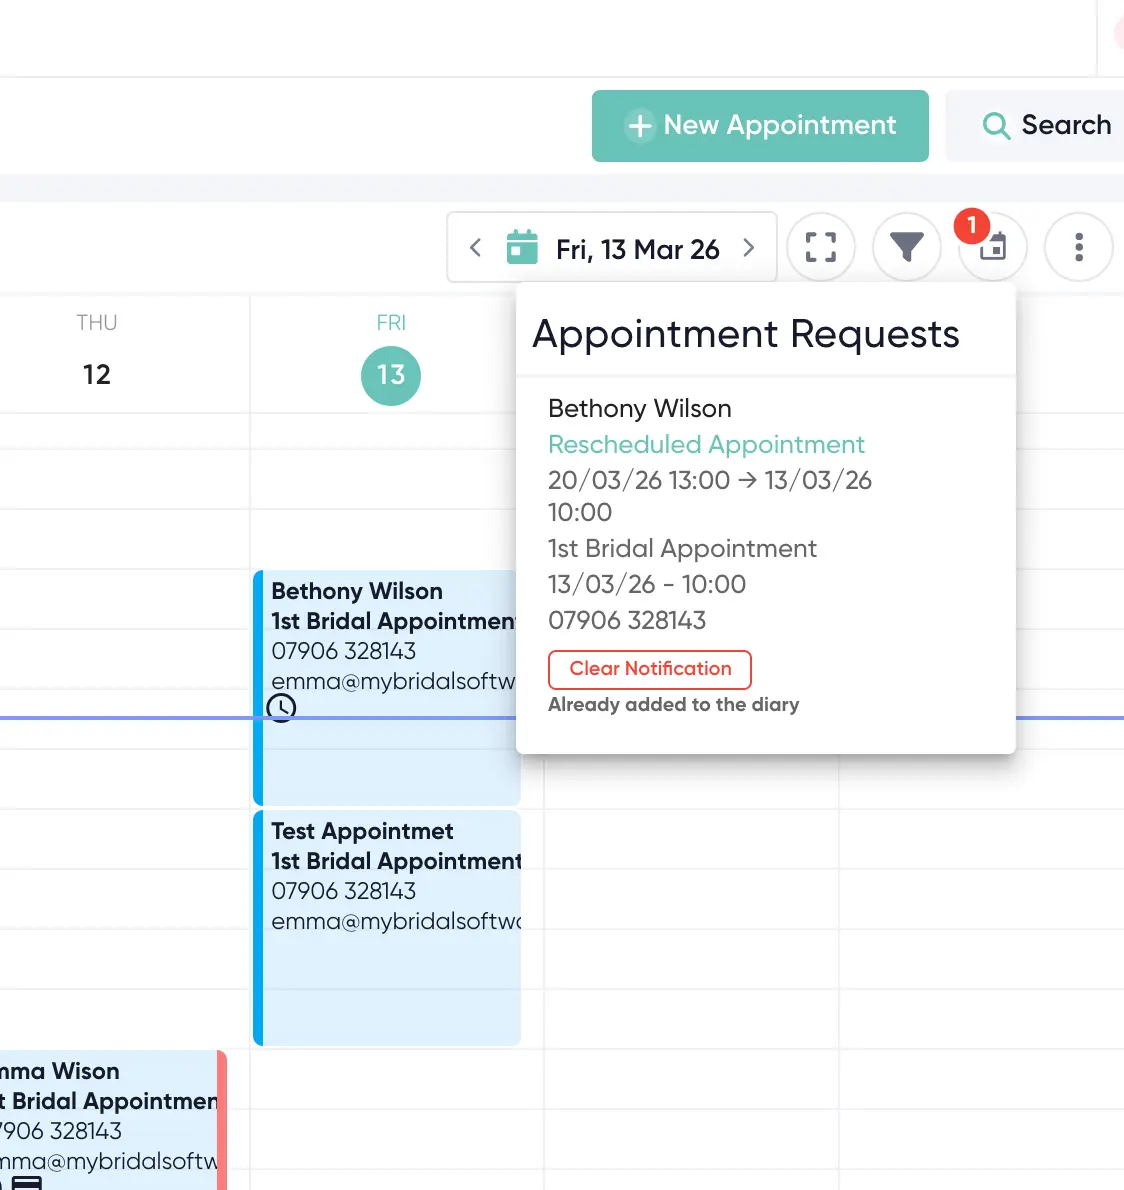
Add-to-Diary Appointments (No Approval Needed)
When a customer reschedules an appointment that goes straight into the diary, the appointment in your diary will automatically move to the new date and time. You do not need to do anything.
When you open the appointment, you will see a small "Rescheduled from [original date and time]" note, so you always know it was moved.

You will also see a notification appear in your App Requests section (the button in your diary toolbar) labelled "Rescheduled Appointment" — this is just to let you know it happened. Since the appointment has already been moved, you will see a "Clear Notification" button along with the note "Already added to the diary".
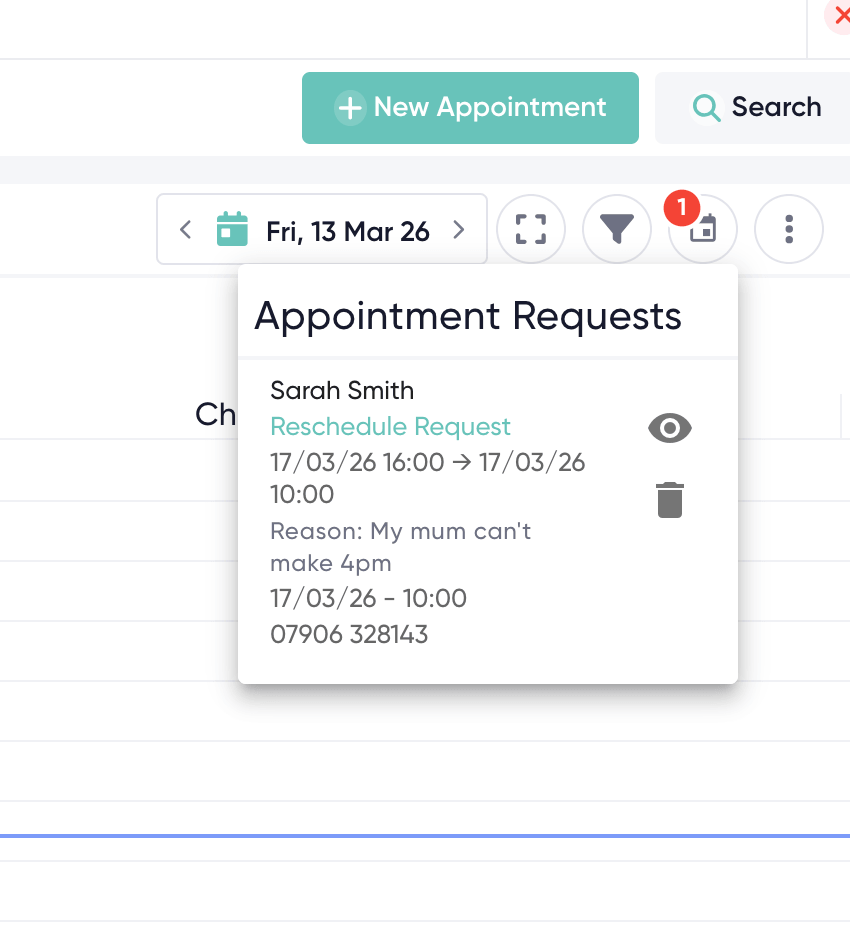
Request-Based Appointments (Approval Needed)
When a customer reschedules an appointment type that requires your approval, a "Reschedule Request" will appear in your App Requests section. It works just like a regular appointment request.
Each reschedule request shows:
- The customer's name
- The label "Reschedule Request"
- The original date and time with an arrow pointing to the new requested date and time
- The customer's reason for rescheduling (if they provided one)
Accepting a Reschedule Request
To accept a reschedule request, simply click on it to open it, just as you would with a regular appointment request. Once accepted, the original appointment will be updated to the new time and will appear in your diary.
Declining a Reschedule Request
If you need to decline the request, click the trash can button on the request or the 'reject' button on the full detail view. For reschedule requests specifically, you will be given the option to enter a reason for declining. This is optional, but if you add one, it can be included in an automated message to the customer (see the Autoflows section below).
When you decline a reschedule request, the customer's original appointment stays as it was - nothing changes in your diary so you may wish to check with the customer if this needs to be cancelled.
4. Setting Up Automated Messages (Autoflows)
You can set up automated emails or text messages to go out when an appointment is rescheduled or when a reschedule request is declined. This works through Autoflows, which you may already be familiar with from your other automated messages. For more help around autoflows you can click here.
There are two new triggers available:
- Appointment Rescheduled — fires when a customer successfully reschedules an appointment that goes straight into the diary. Use this to send the customer a confirmation of their new time.
- Appointment Reschedule Request Rejected — fires when you decline a customer's reschedule request. Use this to let the customer know their request was not accepted and to suggest they get in touch. This is only required if you use appointment requests and want to send automated rejection messages.
How to Create a Reschedule Autoflow
- Go to Automations > Autoflows.
- Click New Autoflow or copy the Default Reschedule message.
- Give it a name (for example, "Reschedule Confirmation Email").
- In the Trigger dropdown, select either "Appointment Rescheduled" or "Appointment Reschedule Request Rejected".
- Add your action (Email or SMS) and select the templated message you want to send. You can use one of our default messages or create your own message template using the 'appointment rescheduled' or 'appointment reschedule request rejected' template actions.
- Click Save.
5. Staff Notifications
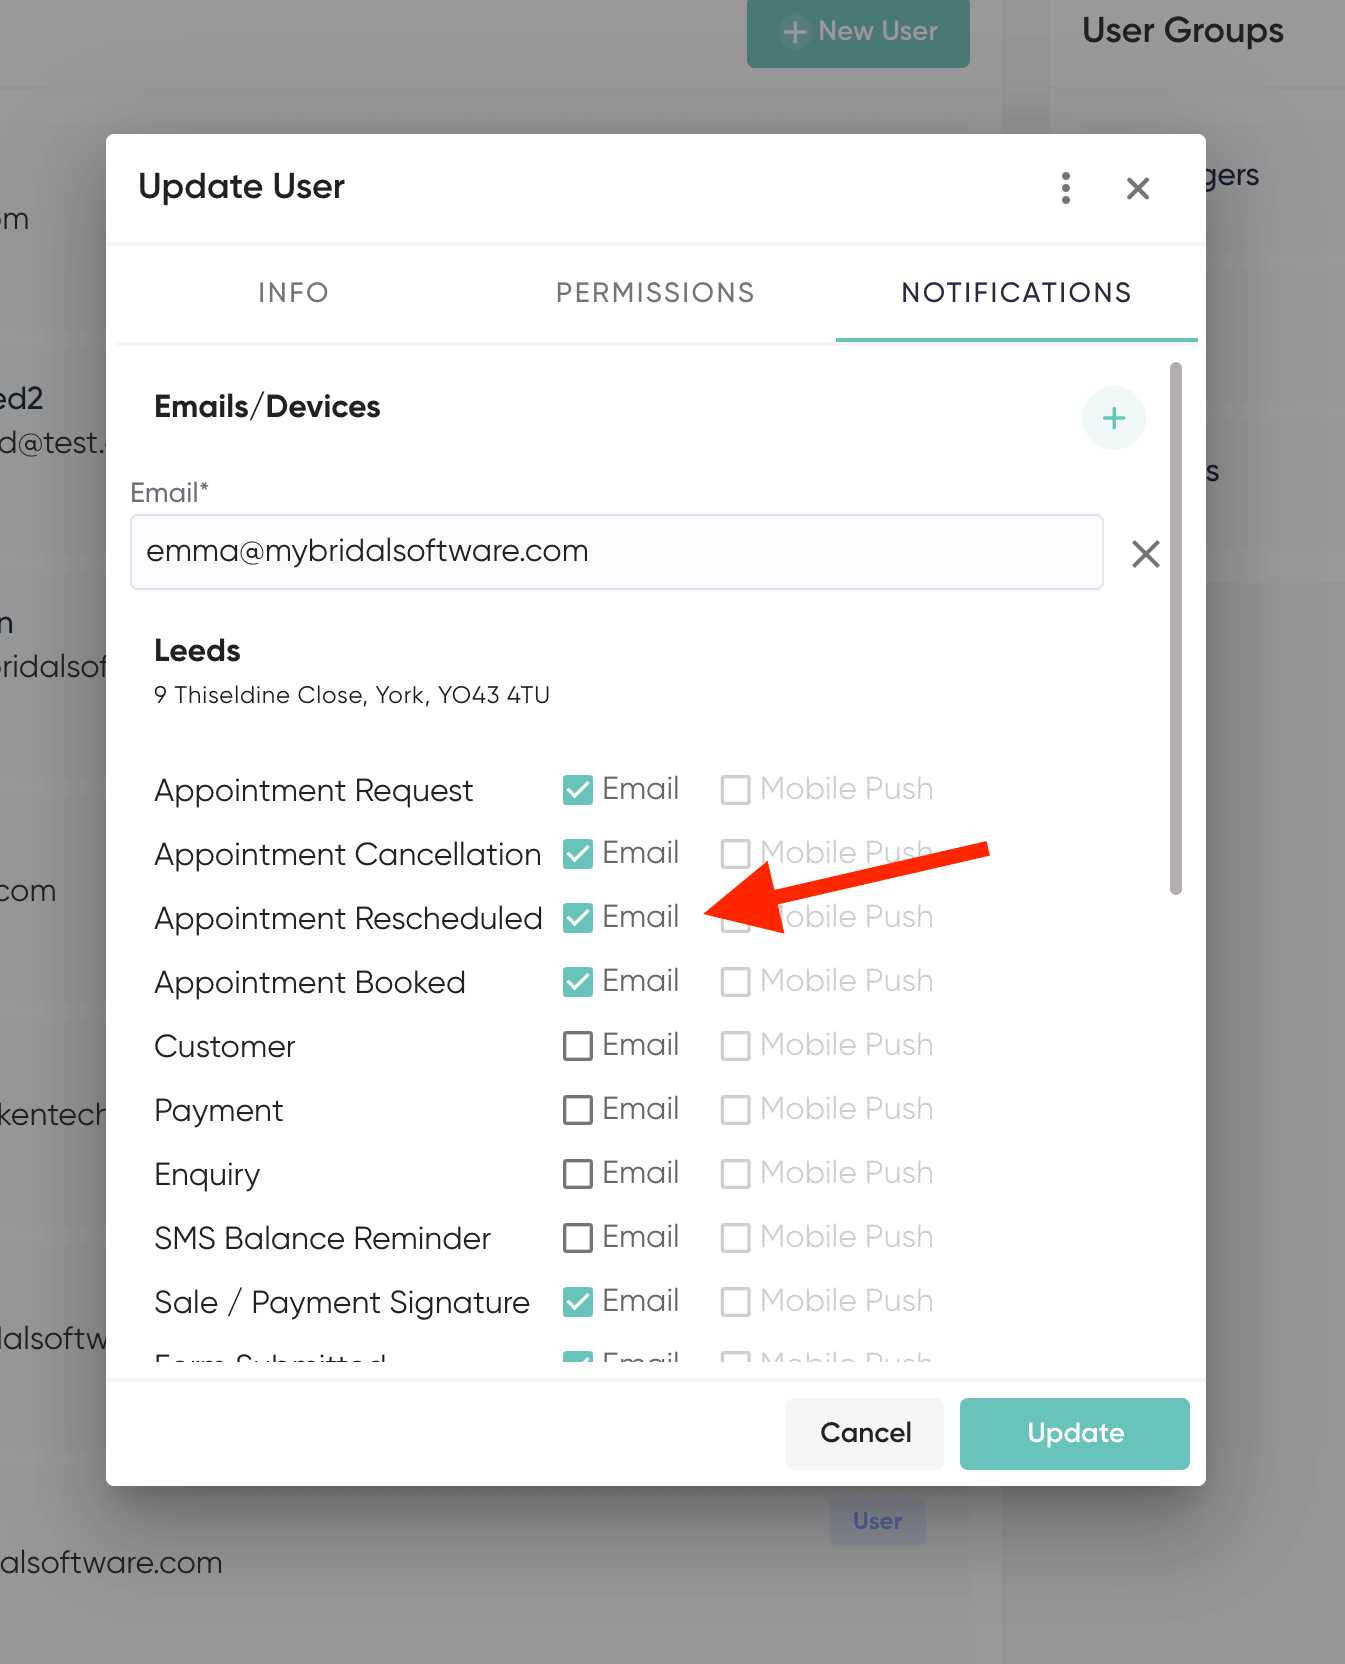
When a customer reschedules an appointment, your staff can receive an email notification letting them know. This is controlled per staff member in their user settings.
How to Enable or Disable Reschedule Notifications
- Go to Settings > Users.
- Click on the staff member you want to update.
- Open the Notifications tab.
- Find the row labelled "Appointment Rescheduled".
- Tick or untick the Email checkbox for the relevant store.
- Click Save.
6. Important Things to Know
- Manual changes by you do not count. If you change an appointment's time yourself within the diary, this does not count towards the customer's reschedule limit. The limit only applies to changes the customer makes themselves through their appointment link.
- Appointment charges carry over. If the customer paid a booking fee or appointment charge, that payment stays attached to the appointment when it is rescheduled - they will not be charged again.
- Reminders update automatically. If you have appointment reminder messages set up (via Autoflows), they will automatically update to be sent based on the new appointment date and time. You do not need to do anything other than click submit when prompted for requests being accepted.
- The limit and deadline are per appointment. The reschedule limit you set (e.g. maximum 2 reschedules) applies to each individual appointment, not to the customer as a whole. If a customer books two separate appointments, they can reschedule each one up to the limit.
- You can always contact the customer directly. Even if the online reschedule deadline has passed or the limit has been reached, you can still change the appointment time manually from your diary. The customer will see a message suggesting they contact you directly.
- Rescheduled appointments are linked. When viewing a rescheduled appointment in the diary, you can see the history of the appointment and where it was rescheduled from so you always have full visibility by clicking the appointment history button on the top bar of the appointment pop up.